S u m m a r y
|
| Catalogue
Number and Description: |
Hobby Decal # STXX011
- A6M Zero Stencil Data Dry Transfers |
| Scale: |
available in 1/72, 1/48 &
1/32 scales |
| Contents and Media: |
Dry Transfer markings plus
instructions and notes |
| Price: |
USD$13.00 each |
| Review Type: |
FirstLook |
| Advantages: |
Perfect finish without
visible film or silvering is possible with this media; extensive
range; excellent reproduction of colors; first-rate printing and
production |
| Disadvantages: |
More delicate under rough
handling; initial positioning critical; may be difficult to
apply on compound curves |
| Recommendation: |
Highly Recommended |
Reviewed by
Rodger Kelly

HyperScale is proudly sponsored by
Squadron
Hobbydecal is a relative newcomer to the already well populated decal
world. Located in Seoul, Korea, they first commenced producing
decal sheets in 2003. If you could append a name to them, it would
have to be prolific as they have released a virtual flood of sheets
to date.
By far the vast
majority of their products to date have been confined to stencil
data in all the popular scales but I do note that they have dipped a
tentative toe into the markings world with the release of sheets for
the F/A-18F Hornets of VF-103.
You need to be
aware that, whilst the word 'decal' is in their name, they do not
produce the 'dip into a bowl of warm water' waterslide type decals
that most people are familiar with. Hobbydecal produce what is
termed 'dry transfers' or 'rub down' type decals.
What does 'dry
transfer' and 'rub down' mean and how do you use their product?
Well, full instructions for their use are included on a stiff
cardboard header card in each of the products. The process of
applying them is broken down into eight stages, and to quote
Hobbydecal, here is how you do it:
Step 1
Cut transfers to shape. When trimming using
a ruler on a hard surface, take care not to press the ruler too
firmly against other markings. Unlike water slide decals, do not
cut too close to the edge of the markings but leave a
comfortable margin, allowing easier rubbing. The size of this
margin will depend on the area of application.
Step 2
Select transfer location and position
carefully, as repositioning will be impossible once rubbing
begins. One recommended method is to secure the transfer to the
surface with masking tape once it has been properly positioned.
Certain areas may preclude the use of masking tape. In the case
of small markings, it may be easier to forego the use of tape.
Step 3
Apply the transfer using a burnisher
available at any good art shop, or any similar tool with a hard,
rounded tip. Perform tests to find the optimum rubbing pressure
on the logo or product title portions of the transfer sheet.
Start at one end and work across, maintaining uniform rubbing
strokes and pressure. Make sure that you are not applying too
much pressure, as damage to the backing film may result.
Step 4
Carefully lift the edge to check that
everything has transferred, but be careful not to move the
backing film. If the transfer isn't complete, lay the film back
down and rub over the items that have not yet been transferred.
Continue checking until the marking has been completely
transferred onto the model.
Step 5
Place the smooth side of the backing paper
over the transfer and burnish with appropriate pressure in order
to set the adhesive. Pay particular attention to empty spaces
such as panel lines, as the ink may only have been separated
from the backing paper and did not set on to the surface. To set
such areas, use a moistened cotton swap to lightly push the
transfer down on to the surface.
Step 6
A mist coat of clear lacquer can be applied
to seal and protect the transfer, but a heavy, wet coat of
lacquer can cause certain colours to bleed. Apply a light
initial coat, then apply 1 or 2 more to completely seal the
transfer. Any water-based acrylic clear can be used without fear
of colour bleed.
Step 7
This is the process of layering markings over
previously transferred markings. In most cases this can be done
without any problems, but there can be instances where the lower
layer marking breaks away from the surface. To prevent this, a
light coat of clear lacquer, allowed to thoroughly dry should be
applied before transferring the second marker layer.
Step 8
In areas of complex panel lining, small
portions of the marking may not have completely transferred. In
this case, use small amounts of flat or semi-gloss paint of
identical colours to fill in the gaps. Unlike water slide
decals, these markings can be touched up with enamel paints and
sable brushes.
Advantages and disadvantages?
Ah, the age old debate! Rub down decals have been around for many
years. They were primarily used in the drafting and drawing world
and were produced (still are I think) by many companies. Lettraset
comes to mind and I can recall using their letters and numerals sets
to apply aircraft codes and serial numbers on many occasions.
The advantages of rub down decals as Hobbydecal sees them are as
follows:
-
It is an easier and faster method than decals
in transferring and finishing.
-
There is no silvering effect after
transferring.
-
In most finishing cases, you do not need to
try to spray and spray with top coats to hide decal film on your
work..
-
You do not need to use other decal solutions
or solvents.
-
The surface of marking after transferring can
be polished flatter than decals.
-
Missing transfer dots or fragments can be
easily fixed with modelling enamels or paints of the same
colour.
-
Effective long-term preservation (Well
preserved Dry Transfers over 10 years old have been successfully
applied without failure).
The disadvantages of rub down decals, again as seen by Hobbydecal
are as follows:
-
You need to be more careful not to scratch or
crack the transferred marking with rough handling.
-
It is impossible to change location after
transferring.
-
It is harder to transferring on the surface
of irregularly curved, sharply bent or tightly cornered areas.
-
You need to be more careful in multi
transferring than multi decaling (other colour markings over the
first transferred marking).
-
Printing requires a more difficult process,
resulting in higher prices.
So there you have it. To be truthful, they do have some definite
advantages if you are modelling natural metal aircraft and I suspect
that most modellers will use a mixture of both waterslide and rub
down decals to effect their latest masterpiece.
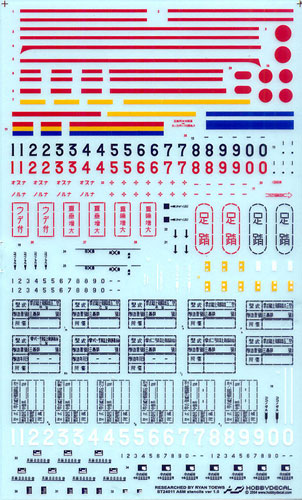
A6M Zero Stencils – Version 1
On to their latest release for the A6M Zero Stencils – Version 1
This sheet is offered in 1/72 scale (ST72011), 1/48 scale (ST48011),
1/32 scale (ST32011), and 1/24 scale (ST24011). Very complete!
That’s how you could describe this sheet Hobbydecal advises that
not all of the supplied stencils are applicable to the every
sub-type of the Zero so you need to refer to your references before
you launch into applying them all on a single model.
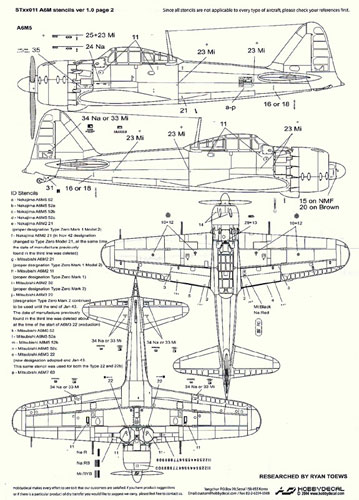
The placement guide is first rate too. It consists of an A-4 sized
double-sided sheet with illustrations of both left and right sides
of the fuselage as well as top and bottom plan views. Hobbydecal
helps you out here as it keys each decal with a number and shows the
number of the decal as well as a large and readable reproduction of
the decal itself and indicates where it is to be applied.
Click the thumbnails
below to view larger images:
The decals are packed in a clear plastic zip-loc bag along with a
stiff cardboard header and the placement guide.
Hobbydecal have provided a well produced, packaged and presented
product. It's your choice if you want try them. For my money, they
have their place but will not replace the waterslide decal
entirely.
Recommended.
Postscript
If you want to see the full range of decals
offered as well as placement guides that you can download, head on
over the Hobbydecal's website at
http://www.hobbydecal.com/
http://www.hobbydecal.com/
Review Copyright © 2006 by Rodger Kelly
This Page Created on 16 August, 2006
Last updated
15 August, 2006
Back to
HyperScale Main Page Back to Reviews Page |
 Home | What's
New | Features
| Gallery |
Reviews | Reference
| Forum
| Search
Home | What's
New | Features
| Gallery |
Reviews | Reference
| Forum
| Search